
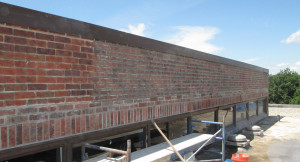
PHOTO 3A: The new roofing at SD 73 Elementary North was encroaching on this clerestory sill and required that it be raised. As part of this project, the steel lintel was exposed. It was prepped, primed and painted and new through-wall flashing was installed.
The detailing of the new head should be specific, noting the existing construction, needed demolition and new materials. For our masonry example, one should determine if the existing brick and/or lintels are to be salvaged. Typically, on aged buildings, it is not worth the time and effort to try and salvage steel lintels and to prep, prime and paint them. We typically call for new hot-dipped galvanized steel lintels and have them primed and painted prior to installation. In consideration of our masonry wall after the lintel sizing is known and drawn into the detail, one must not forget to use and design a new through-wall flashing system, complete with stainless-steel drip, weeps and end dams.
When a new door and frame is required or desired, shop drawings are typically required and prudent. Review them for appropriate frame height, door swing, type of priming (hollow metal doors and frames typically are ordered and delivered to the construction site “shop primed”) and hinge reinforcement. An additional 3/8-inch steel plate may be welded to the frame behind the hinge so that the hinge anchors have something to “bite” into, which prevents the door from racking or pulling off the frame when caught in the wind. Note that often the delivery of new hollow metal doors can be 12 to 16 weeks after the approval of shop drawings.
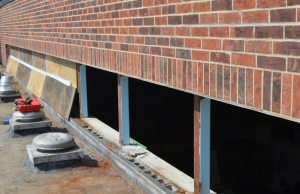
PHOTO 4: The clerestory windows at SD 73 Elementary North were removed and revealed concrete masonry units with open cores, which were grouted solid prior to raising the sill.
When raising a door sill of extended height, look at the current wall construction as the first key to a possible material. For example, if a wall is masonry, perhaps the sill should be raised with masonry or concrete. The sill extension should be of the same width as the wall and be structurally sound and anchored to the existing construction. The detailing of the sill should be designed and detailed as thoroughly as the head condition. The material selected to raise the sill should not only be appropriate for the new roof system, but also for the interior conditions. It should be well anchored to the existing substrate and able to support the weight of users.
Typically, I detail the new roof flashing extending up and over the new sill, rendering it watertight. Over that, I place a stainless-steel or prefinished metal sill flashing over the entire sill and flashing to provide protection. The sill flashing should be set in water block. Over the sill flashing, the new door frame would be set and anchored to the wall. The anchors need to be selected for the wall type. After the door frame is set, I like to have the hollow metal frames grouted to give them some rigidity.
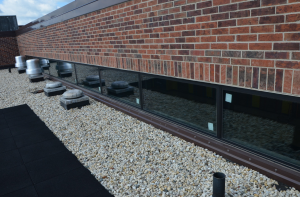
PHOTO 5: A view of the new clerestory, which features a raised sill, restored steel lintel with through-wall flashing system and glass with a high solar heat-gain coefficient to reduce the interior heat gain.
The detailing of the door is not yet complete. The door jamb conditions need to be detailed. If existing, the old sealant should be removed and replaced; if new, primer, foam rod and sealant should be specified. If high winds are expected to drive rain at the door, consider an exterior, protective door sweep that will prevent water from being driven under the door.
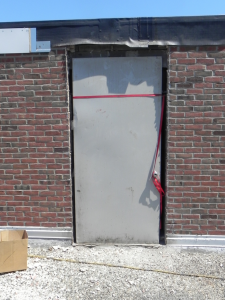
PHOTO 6: Even the existing door was low to the existing roofing at SD 113 Deerfield High School. Here the door frame has been removed; the door has been placed for interior protection.
PHOTOS & ILLUSTRATIONS: Hutchinson Design Group Ltd.


Be the first to comment on "Code-mandated Thermal Insulation Thicknesses Require Raising Roof Access Door and Clerestory Sill Details"